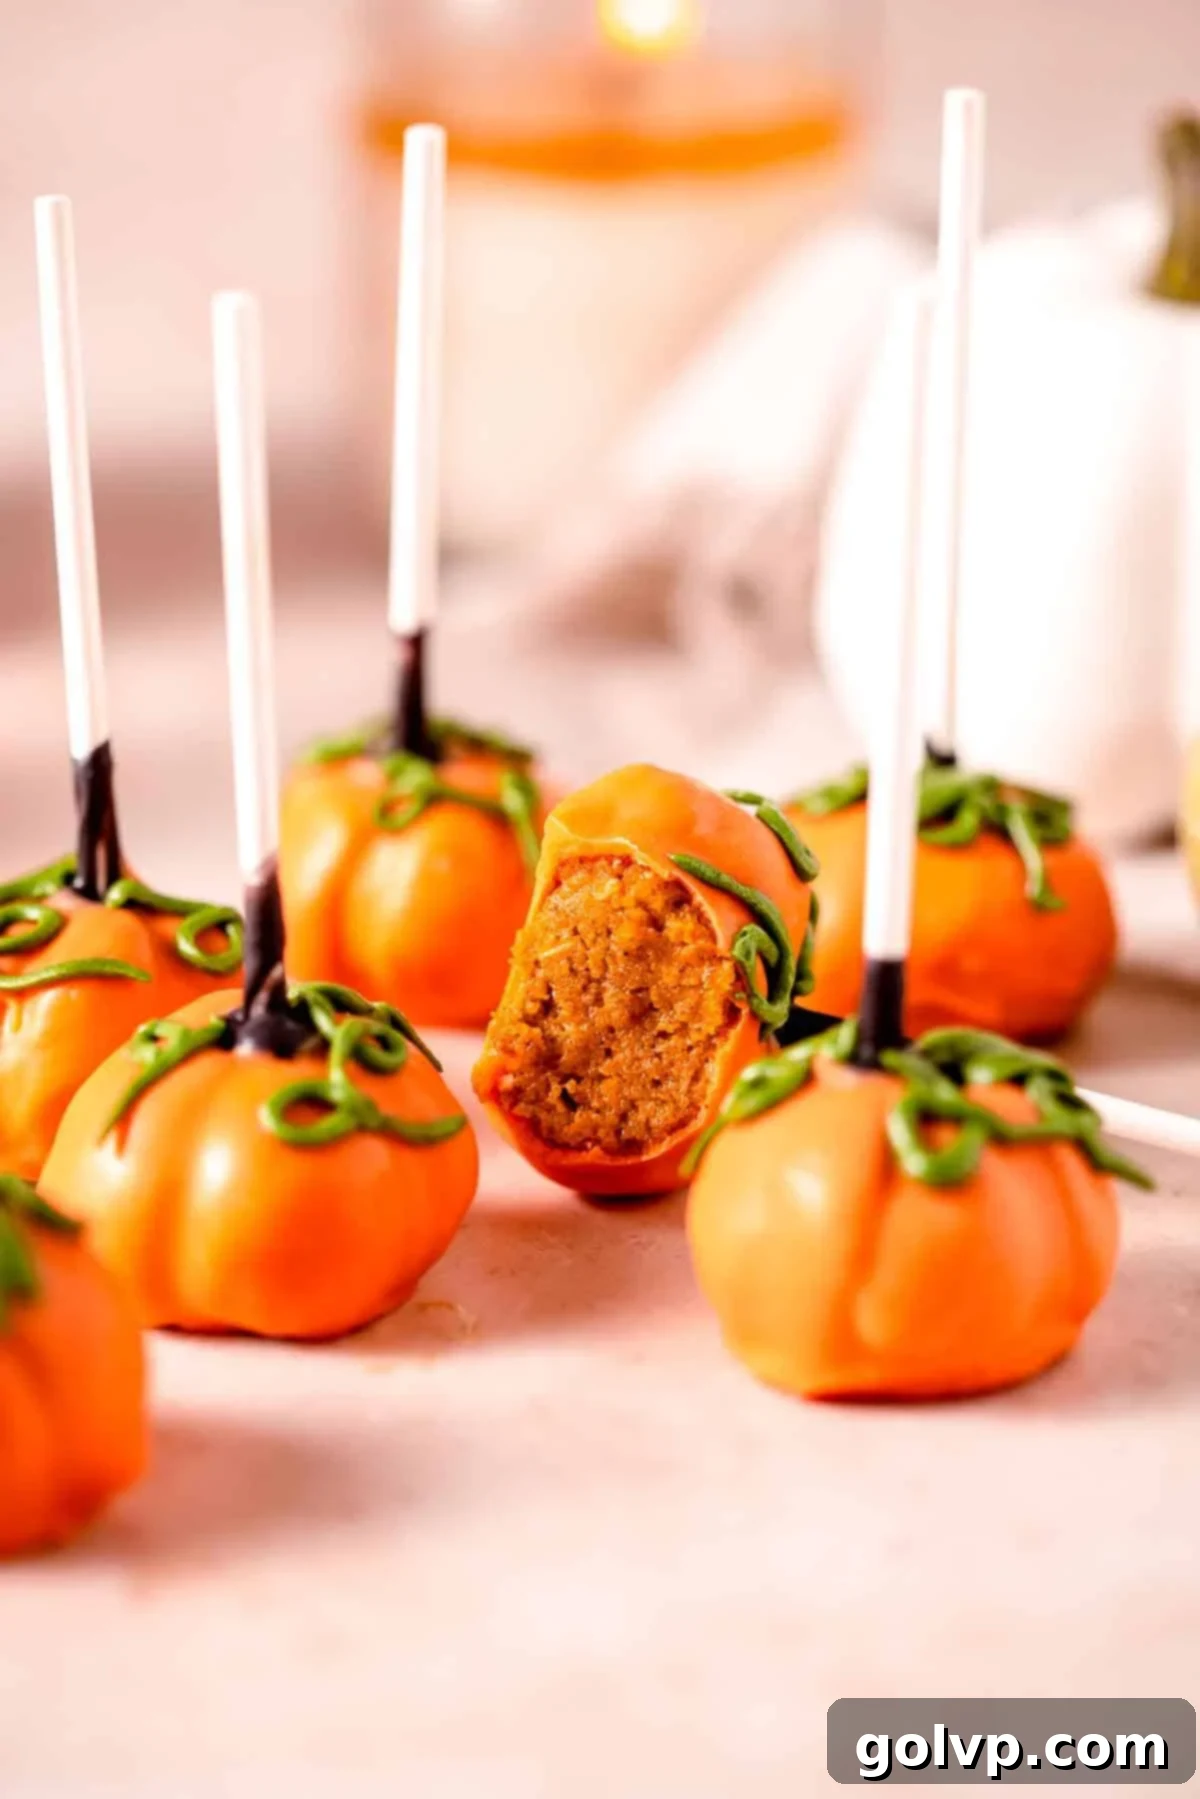
Irresistible Pumpkin Cake Pops: Your Ultimate Guide to Perfect Fall Treats
Indulge in the festive spirit of autumn with these utterly delightful pumpkin cake pops! Each bite offers a harmonious blend of soft, moist pumpkin-spiced cake encased in a vibrant, crunchy candy melt coating. These charming treats are not just delicious; they are a celebration of fall flavors, making them an ideal addition to your Thanksgiving dessert spread, a whimsical touch for a Halloween party, or a magical surprise at a Cinderella-themed birthday celebration. What truly makes this recipe stand out is its incredible versatility: it’s perfectly adaptable for using up leftover cake or even transforming a baking mishap into something truly spectacular. Say goodbye to food waste and hello to scrumptious, bite-sized delights that everyone will adore!
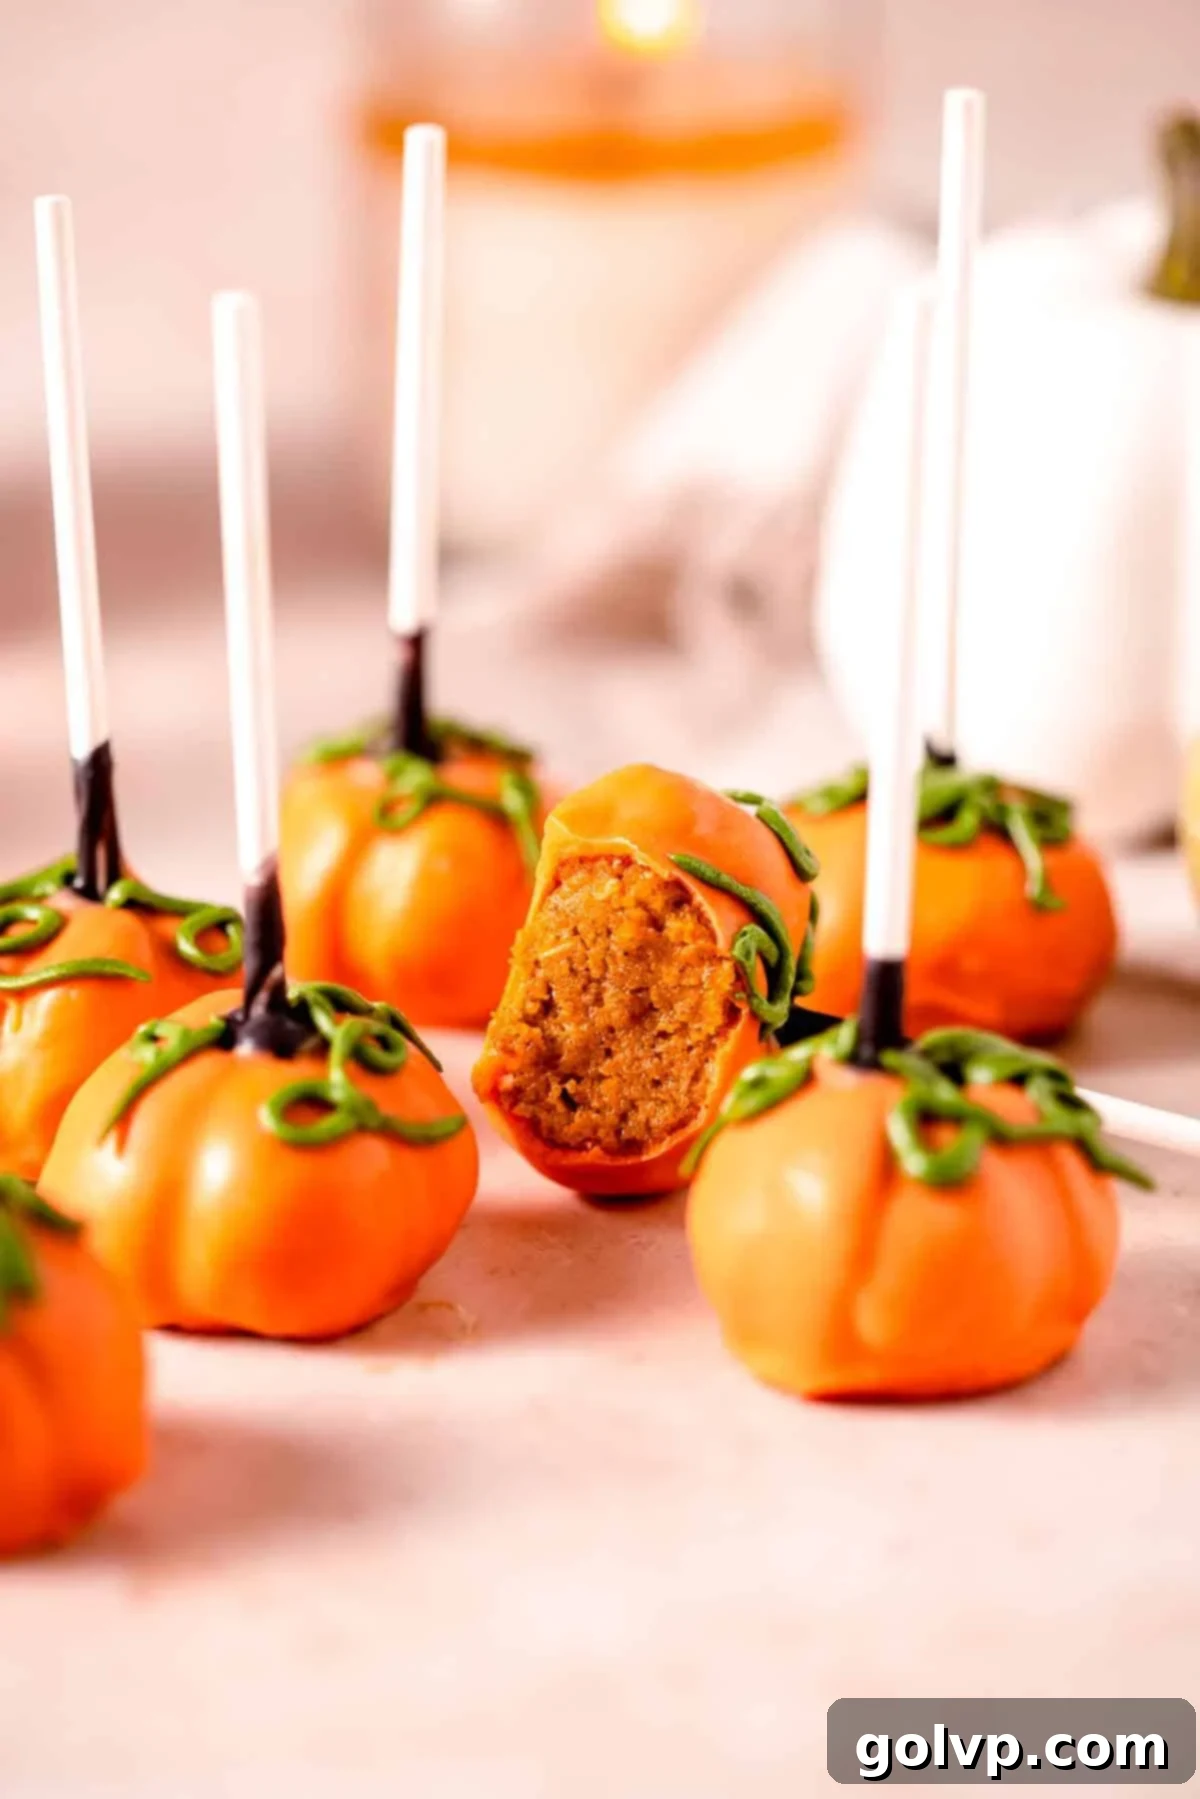
Purchasing the items in this post supports this blog, at no additional cost to you. As an Affiliate Product marketer and Amazon Associate, I earn from qualifying purchases.
[feast_advanced_jump_to]
Why You Will Absolutely LOVE This Pumpkin Cake Pop Recipe:
- Exquisite Texture: Prepare your taste buds for an unparalleled sensory experience! These pumpkin cake pops boast an incredibly soft, buttery, and moist pumpkin-spiced interior that truly melts in your mouth, reminiscent of a luxurious cake truffle. This delightful core is perfectly complemented by the crisp, satisfying crunch of the candy melt coating, creating a contrast that is both exciting and addictive.
- Ideal for Leftovers & Baking Mishaps: Never let a perfectly good cake go to waste again! Whether you have a few slices of pumpkin cake left from a gathering, or perhaps a baking experiment didn’t quite go as planned (but still tastes amazing!), this pumpkin cake pop recipe is your culinary savior. It’s an ingenious way to repurpose excess cake into an entirely new, equally delicious, and impressively presented dessert. It transforms any “ruined” cake into a delightful success story!
- Easy, Engaging & Fun for All Ages: Creating these pumpkin cake pops isn’t just baking; it’s a memorable activity perfect for family bonding. The process of mashing, rolling, dipping, and decorating is incredibly straightforward, yet wonderfully engaging. Kids and adults alike will love shaping the cake balls into adorable mini pumpkins and adding the final decorative touches. It’s a fantastic project for holiday weekends, rainy afternoons, or any time you want to add a sprinkle of joy and creativity to your kitchen.

Essential Ingredients for Perfect Pumpkin Cake Pops
Before diving into the full step-by-step instructions in the recipe card below, take a moment to read through these key ingredient insights. They contain all the crucial tips you’ll need for guaranteed success in creating these delightful pumpkin-shaped treats!
Cake: The foundation of our delicious pumpkin cake pops! While any cake can technically be used, for an authentic and rich fall flavor, we highly recommend a pumpkin cake recipe. My one-bowl, easy pumpkin cake is perfect for this. However, don’t hesitate to use a store-bought boxed cake mix, any leftover cake you might have (vanilla, spice, or even chocolate cake can be fantastic bases), or even a cake that had a slight baking mishap but still tastes wonderful. The flavor of your finished cake pops will directly reflect the cake you choose, so pick something you love!
Frosting: This is the magical binding agent that brings your cake crumbs together and infuses the cake pops with essential moisture, resulting in that irresistible soft texture. It’s particularly vital if you’re working with a cake that might be a bit dry. Beyond its structural role, frosting is also used to pipe the charming green vines onto your finished pumpkin cake pops, adding an extra layer of visual appeal. A cream cheese frosting pairs beautifully with pumpkin cake, but a simple buttercream also works wonderfully.
Candy Melts: The secret to a perfect, glossy, and crunchy exterior for your cake pops. These specialized confectionery coatings melt smoothly and set firm at room temperature, creating a sturdy shell without the fuss of tempering. I strongly advise against using regular melted chocolate for dipping, as without the precise and lengthy process of tempering, it tends to set unevenly, can be dull, and will easily melt on your fingers, leading to a messy experience.
Refined Coconut Oil or Vegetable Shortening: This ingredient is your best friend when working with candy melts. Adding a small amount helps to thin out the melted candy, ensuring a smoother, more even coating that isn’t overly thick. A thinner coating allows the pumpkin indentations to remain visible and prevents a heavy, clunky exterior. Crucially, opt for *refined* coconut oil to avoid imparting any coconut flavor to your delicate pumpkin cake pops. Vegetable shortening is a great neutral alternative.
Lollipop Sticks: These are indispensable for holding your cake pops, making them easy to dip, decorate, and enjoy. Standard lollipop sticks are ideal, but if you’re in a pinch, sturdy bamboo skewers cut to size can also work. Ensure they are strong enough to support the weight of the cake pop without bending.
Detailed Step-by-Step Guide to Crafting Pumpkin Cake Pops
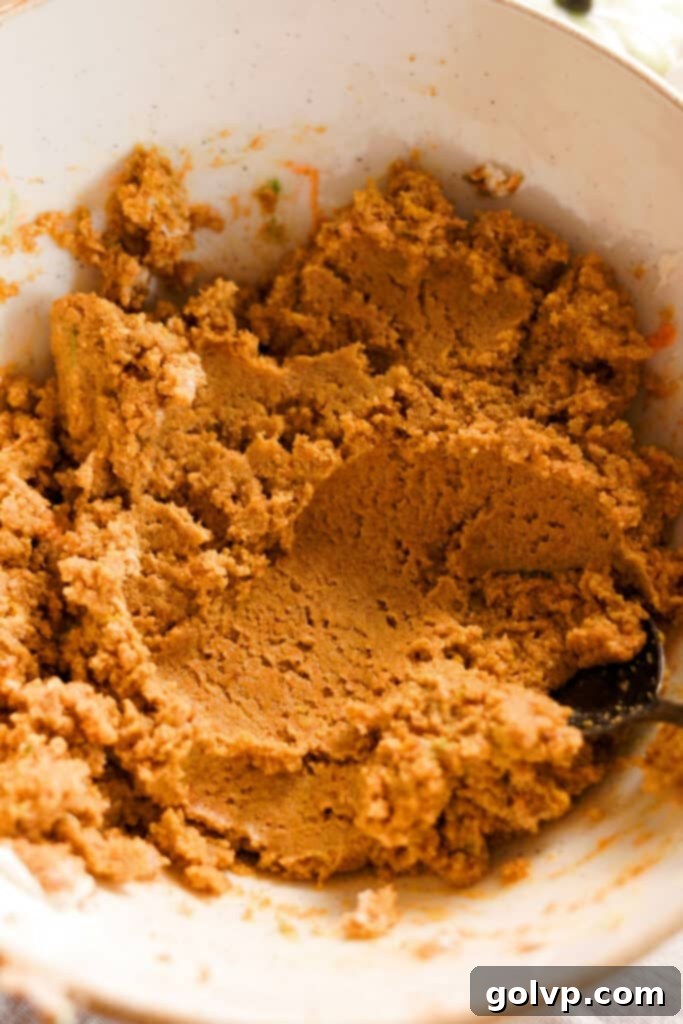
Step 1 – Prepare the Cake Mixture: Begin by taking your baked pumpkin cake and crumbling it thoroughly into a large mixing bowl. You can do this with your hands for a tactile experience or use a potato masher for efficiency. Once the cake is completely crumbled into fine, even pieces, gradually add the frosting, about a half cup at a time. Mix vigorously until you achieve a soft, pliable consistency that can be easily rolled into balls. For exceptionally soft and moist cake pops, I recommend using all of the frosting from my pumpkin cake recipe, but remember to set aside ¼ cup of green-tinted frosting later for piping the decorative vines. Ensure the frosting is thoroughly incorporated for a consistent mixture.
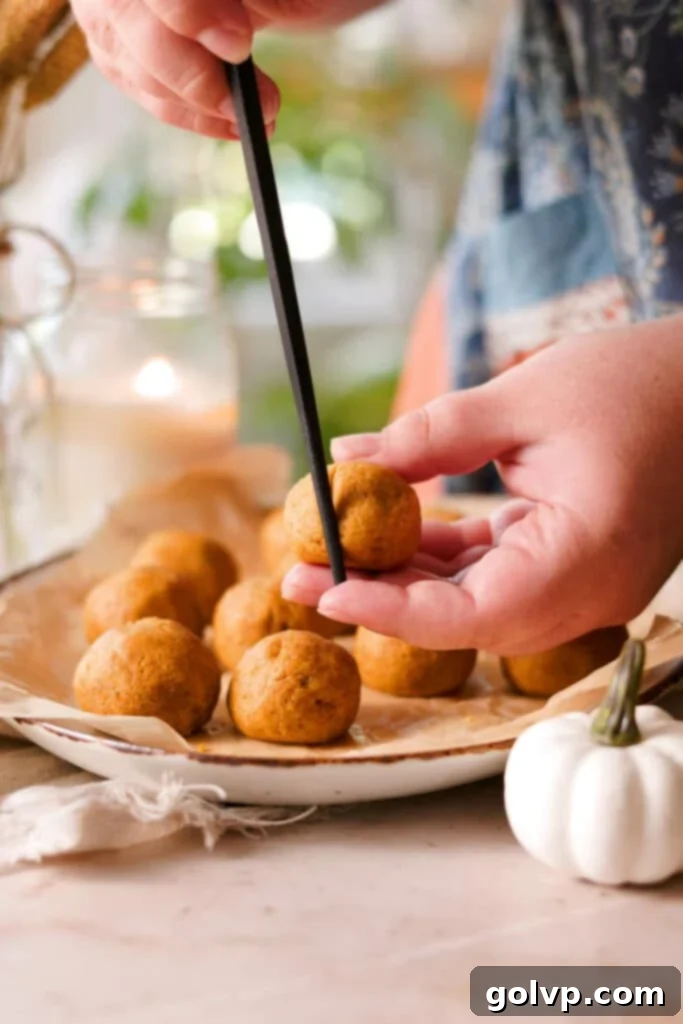
Step 2 – Shape the Pumpkin Cake Pops: Once your cake mixture is ready, begin rolling it into uniform balls, each approximately 1.5 inches (3.8 cm) in diameter. Consistency in size is key for even dipping and a professional finish. If you find the mixture is too soft or sticky to shape easily, simply place the rolled balls into the freezer for about 10 minutes to firm up. Next, transform these cake balls into charming pumpkins! Using a chopstick or the blunt end of a lollipop stick, gently roll over the shaped cake pops in several segments to create the characteristic pumpkin indentations. Aim for relatively deep grooves to ensure the pumpkin shape remains visible after coating. Arrange the shaped cake pops in a single layer on a plate or baking sheet and place them in the freezer for a further 15 minutes to chill thoroughly.
Step 3 – Prepare the Black Candy Melts for Stems: While your pumpkin cake pops are chilling, prepare the black candy melts. Place them in a clean, microwave-safe bowl. Heat them in the microwave in short bursts, typically 10-second increments, stirring thoroughly after each interval. Continue this process until the candy melts are completely smooth and fluid. It’s crucial not to overheat the candy melts, as this can cause them to seize, thicken, or become lumpy and unusable. If you don’t have a microwave, you can melt them using a double boiler method: place the bowl over a pot of simmering (not boiling) water, ensuring the bottom of the bowl does not touch the water, and stir until smooth.
Step 4 – Insert Lollipop Sticks: Retrieve the chilled pumpkin cake pops from the freezer. One by one, dip the tip of a lollipop stick into the melted black candy melts, coating about an inch of the stick. Immediately insert the coated end of the stick into the center of a cake pop, pushing it about halfway through. The melted candy acts as a “glue,” firmly securing the stick to the cake pop and preventing it from falling off during dipping.
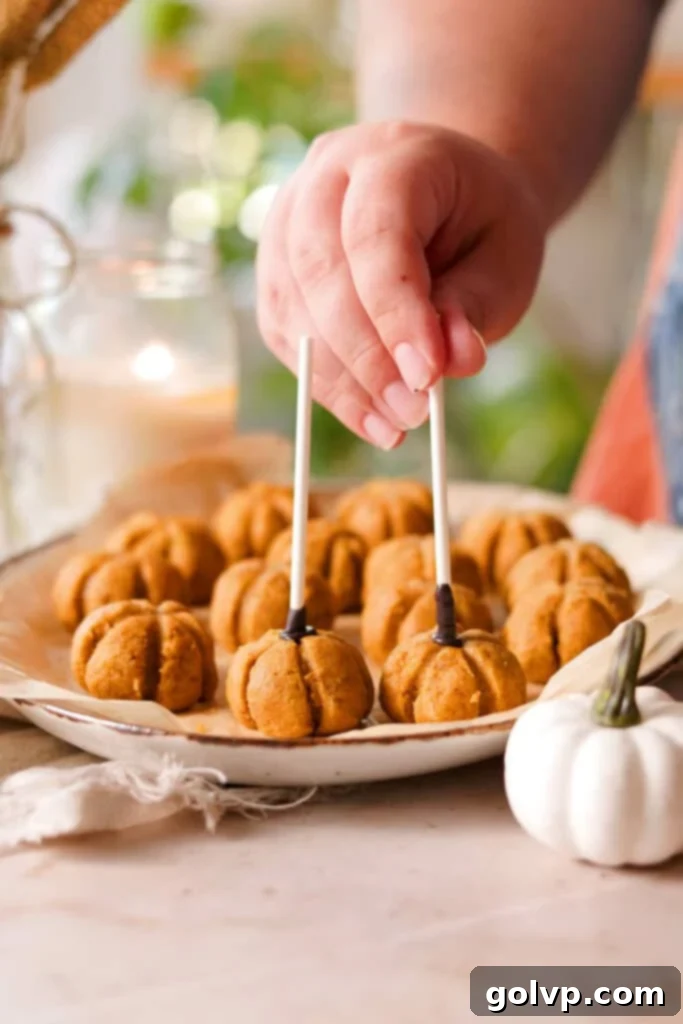
Step 5 – Chill to Set Sticks: After inserting sticks into all the cake pops, place them back into the freezer for another 15 minutes. This crucial chilling step allows the black candy melts to fully set, firmly anchoring the sticks within the cake pops, which is vital for smooth dipping in the next stage.
Step 6 – Melt Orange Candy Melts for Coating: While the cake pops are firming up, prepare your main coating. Melt the orange candy melts in a separate clean bowl, using the same gentle microwave or double boiler method as described in Step 3. Once melted and smooth, add 1 to 3 teaspoons of refined coconut oil or vegetable shortening. Stir this in thoroughly; the fat helps to thin out the candy melts, achieving a perfect, dippable consistency that won’t create an overly thick or uneven coating. For the easiest dipping experience, transfer the thinned orange candy melts into a tall, narrow glass or mug. This allows you to fully submerge the cake pop with less candy melt.
Step 7 – Dip the Pumpkin Cake Pops: Carefully take a chilled cake pop by its stick. Dip it smoothly into the melted orange candy melts, submerging it completely up to the point where the stick meets the cake (the ‘stem’ of your pumpkin). Gently lift the cake pop out of the candy melt. Allow any excess coating to drip off naturally. You can gently twirl the stick between your fingers or tap it lightly against the rim of the glass to encourage drips, being extremely careful not to dislodge the cake pop from its stick.
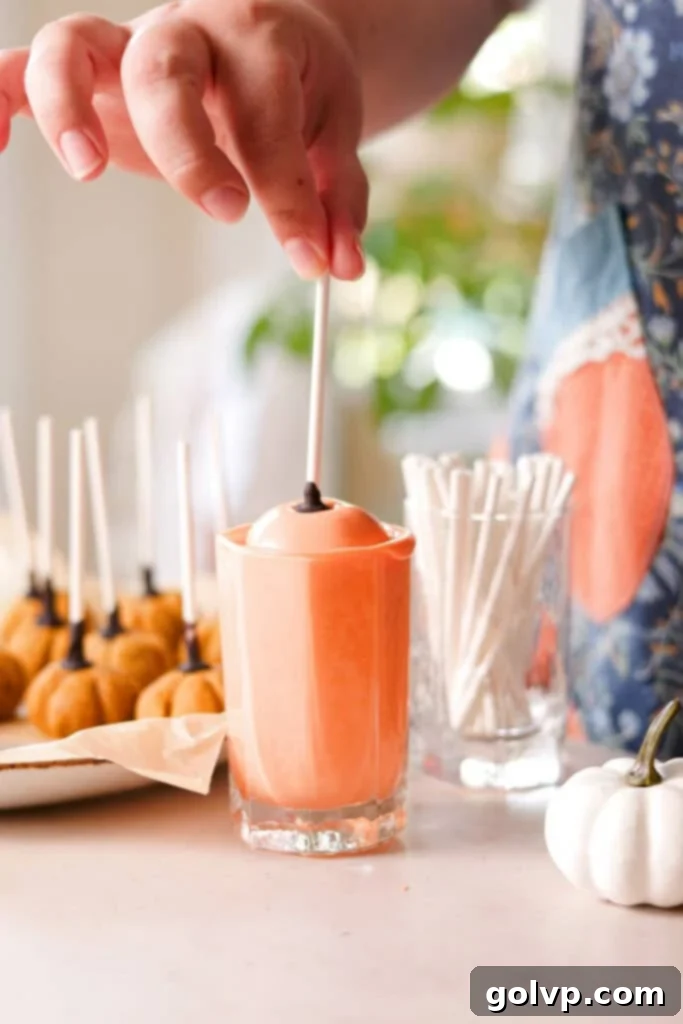
Step 8 – Set the Coated Cake Pops: As each cake pop is dipped, carefully place it upright on a parchment-lined baking sheet or stand it in a block of Styrofoam (if you have one) to allow the orange candy coating to set completely. This usually takes about 10-15 minutes at room temperature, or quicker if placed in the refrigerator.
Step 9 – Decorate with Green Vines: Once all the pumpkin cake pops are fully dipped and the coating has set, it’s time for the finishing touch! Take the ¼ cup of reserved frosting and add a few drops of green food coloring, mixing until you achieve your desired shade of green. Transfer the green frosting into a piping bag, or if you don’t have one, a disposable ziploc bag with a very tiny corner snipped off will work perfectly. Carefully pipe small green swirls, lines, or leaf shapes onto the top of each orange cake pop, connecting them to the “stem” where the stick enters, to create charming pumpkin vines.
Step 10 – Serve and Enjoy: Your beautiful and delicious pumpkin cake pops are now complete! You can serve them immediately for a fresh treat or store them for later enjoyment. For the absolute softest and most delightful cake pop filling, allow them to come to room temperature for about 15-20 minutes before serving. Enjoy these festive fall treats!
Pro Tips for Perfectly Shaped & Delicious Pumpkin Cake Pops
- Emphasize Deep Grooves for Pumpkin Shape: When shaping your cake pops, don’t be shy about creating distinct indentations! The deeper and more pronounced the grooves you create with your chopstick or lollipop stick, the more visible and defined your pumpkin shape will be after the candy melt coating. Subtle grooves tend to disappear under the coating, so press firmly but gently to ensure that iconic pumpkin look.
- Secure the Sticks with Melted Candy Melts: This step is critical to prevent your cake pops from dramatically falling off their sticks into the melted candy bath. Always dip the tip of your lollipop stick into a bit of melted candy melts (the black or brown for stems is perfect here) before inserting it halfway into the chilled cake pop. This candy acts as a strong edible adhesive, ensuring the stick remains firmly in place throughout the dipping process.
- Chill Frequently for Optimal Structure: Temperature control is your best friend in cake pop making. You want the cake pop mixture to be consistently chilled and firm. This not only makes the shaping process easier but also prevents the cake pops from crumbling or losing their shape when dipped into warm candy melts. If at any point the mixture becomes too soft or sticky, don’t hesitate to pop them back into the freezer for 10-15 minutes to firm up.
- Never Overheat Your Candy Melts: Candy melts are sensitive to heat. Overheating them, especially in the microwave, can cause them to seize, become thick, lumpy, or even burn, making them unusable for smooth dipping. Heat them in short 10-15 second bursts, stirring well after each, until just smooth and fluid. Take them off the heat as soon as they reach this consistency.
- Maintain Candy Melt Warmth for Smooth Dipping: As you dip cold cake pops, the melted candy melts will naturally cool down and start to thicken, making it harder to get a smooth, even coating. To counteract this, keep your candy melts warm. If using the microwave, reheat in very short 5-second bursts, stirring each time. If using a double boiler, keep the water simmering gently underneath the bowl. Add a little more refined coconut oil or vegetable shortening as needed to maintain that perfectly dippable, thin consistency.
Make-Ahead & Storage Solutions for Pumpkin Cake Pops
These delightful pumpkin cake pops are a fantastic make-ahead treat, perfect for busy holiday seasons or party planning. The candy coating acts as a protective barrier, sealing in the moisture of the cake and keeping the interior wonderfully soft and fresh for an extended period.
Undipped Cake Pops: If you’re preparing in stages, the un-dipped cake pop balls (after the sticks have been inserted and set) can be stored in an airtight container in the refrigerator for up to 2 days. This allows you to break up the preparation process and dip them closer to your event.
Dipped & Decorated Cake Pops: Once fully dipped and decorated, these pumpkin cake pops can be stored in an airtight container in the refrigerator for up to 3 days. For longer storage, they freeze exceptionally well! Place them in an airtight, freezer-safe container, separating layers with parchment paper to prevent sticking. They will keep beautifully in the freezer for up to 2 months. When ready to enjoy, simply transfer them to the refrigerator to thaw overnight, and then let them come to room temperature for about 15-20 minutes before serving to ensure the softest, most delicious texture.
Pumpkin Cake Pops Recipe FAQs
Candy melts are specifically formulated to melt smoothly and set firm and hard at room temperature without the need for tempering. Tempering regular chocolate is a precise and time-consuming process required to achieve a stable, shiny, and snap-able coating that doesn’t melt easily at room temperature. Without tempering, regular chocolate will likely be dull, prone to blooming (white streaks), and will easily melt and get messy in your hands, making for a less enjoyable cake pop experience. Candy melts also come in a wide array of vibrant colors, perfect for festive decorations like our orange pumpkins!
There are a few common reasons for thick candy melts. Firstly, they might have cooled down too much, especially after dipping several cold cake pops. To fix this, gently reheat the candy melts in the microwave (in very short 5-10 second intervals, stirring well) or over a pot of hot water until they return to a fluid consistency. Secondly, overheating can also cause candy melts to seize and thicken. If this happens, try stirring in a teaspoon or two of refined coconut oil or vegetable shortening; this often helps to thin them out and restore a dippable texture. Using a tall, narrow glass for dipping also helps maintain the depth of the melts and thus their warmth.
The primary reason for sticks not holding is often insufficient chilling of the cake pops or not properly “gluing” the stick in place. Ensure your cake pops are very well chilled (pop them back into the freezer for a few minutes if they feel soft) before inserting the sticks. Crucially, dip the tip of each lollipop stick into melted candy melts before inserting it into the cake pop. This melted candy acts as a strong adhesive, ensuring the stick bonds securely to the cake pop as it sets. If the cake pop is warm, the stick won’t set firmly. Always re-chill the cake pops immediately after inserting the sticks to allow this bond to solidify completely before dipping the entire pop.
More Delightful Fall & Pumpkin Recipes:
If you’ve loved making these pumpkin cake pops, be sure to explore my curated collection of best pumpkin desserts for even more easy and delicious pumpkin recipe ideas perfect for the autumn season!
- No Bake Pumpkin Cheesecake Bars
- Pumpkin Spice Cake
- Pumpkin Chocolate Cake
- Pumpkin Cheesecake Cookies
Did you make this recipe? I’d love for you to rate this recipe and hear what you think in the comments below! Share your creation on Instagram and tag @flouringkitchen. Follow me on Pinterestto save and for more recipe ideas.
📖 Recipe

Pumpkin Cake Pops
Mary
Pin Recipe
Shop Ingredients
Equipment
-
Lollipop sticks
-
parchment paper
Ingredients
- 1 pumpkin cake with frosting or use 9” by 12” cake and frosting recipe of choice
- ¼ cup reserved frosting for the vines
- green food colouring as needed
- 6 oz black candy melts or brown
- 24 oz orange candy melts
- 1-3 tablespoons refined coconut oil or vegetable shortening, optional
Shop Ingredients on Jupiter
Instructions
-
Add your baked pumpkin cake (or cake of choice) into a large mixing bowl. Using your hands or a sturdy potato masher, thoroughly mash the cake until it forms fine, consistent crumbs. Gradually add the frosting, starting with a half cup at a time. Mix the frosting into the cake crumbs until the mixture is soft, uniform, and easily rollable into balls. For an extra soft texture in your cake pops, I recommend using the full amount of frosting from your pumpkin cake recipe, but remember to set aside ¼ cup of plain frosting specifically for the green vines decoration later. Ensure everything is well combined.1 pumpkin cake with frosting
-
Once your cake mixture is ready, roll it into uniform balls, each approximately 1.5 inches (3.8 cm) in diameter. If you find the mixture is too soft or sticky to hold its shape well, place the rolled cake balls into the freezer for about 10 minutes to allow them to firm up slightly. To create the pumpkin shape, take a chopstick or the blunt end of a lollipop stick and gently press and roll it over the surface of each cake pop in several segments, creating visible indentations around the ball. The deeper these grooves, the more defined your pumpkin shape will be. Arrange the shaped cake pops in a single layer on a plate or baking sheet and place them into the freezer for another 15 minutes to chill thoroughly and set their shape.
-
In the meantime, prepare your black (or brown) candy melts. Place the candy melts in a clean, microwave-safe bowl. Heat them in the microwave in short bursts, about 10 seconds at a time, stirring well after each increment. Continue until the candy melts are completely smooth and fluid. Be very careful not to overheat them, as this can cause them to thicken and become lumpy. If you do not have a microwave, you can melt the candy by placing the bowl on top of a pot of gently boiling water, creating a double boiler, and stirring until smooth.6 oz black candy melts
-
Remove the thoroughly chilled cake pops from the freezer. Take one lollipop stick at a time and dip its tip into the melted black candy melts, coating about an inch of the stick. Immediately insert the candy-coated end of the stick into the center of a pumpkin cake pop, pushing it about halfway through. The melted candy will act as a strong adhesive, ensuring the cake pop remains securely attached to its stick.
-
Repeat the process of dipping sticks and inserting them into the remaining cake pops. Once all sticks are in place, return the cake pops to the freezer for another 15 minutes. This second chilling period is essential to allow the candy on the sticks to fully set and create a firm bond, preventing the cake pops from slipping off during the final dipping stage.
-
While your cake pops are chilling, prepare the orange candy melts for the main coating. Melt them in a clean bowl using the same gentle microwave or double boiler method you used for the black candy melts. Once smooth and melted, add 1-3 teaspoons of refined coconut oil or vegetable shortening. Stir it in thoroughly. This additive is crucial for thinning out the candy melts, making them much easier to dip into and ensuring a smoother, more even, and less thick coating. For the best dipping results, transfer the thinned orange candy melts into a tall, narrow glass or mug. This allows for deep submersion with less candy, which helps maintain its temperature and consistency.24 oz orange candy melts, 1-3 tablespoons refined coconut oil
-
Carefully take a chilled cake pop by its stick and smoothly dip it into the melted orange candy melts. Ensure the cake pop is fully submerged all the way up to the “stem” where the stick begins, covering all of the cake. Gently lift the cake pop out of the candy melts. Allow any excess coating to drip off back into the glass. You can gently spin the stick between your fingers or lightly tap the stick against the edge of the glass to encourage drips, always being extremely careful to prevent the cake pop from detaching. The goal is a smooth, even, and relatively thin coating.
-
As each cake pop is dipped, place it upright on a parchment-lined sheet or into a Styrofoam block to allow the orange candy coating to set completely. This should take about 10-15 minutes at room temperature, or you can place them in the refrigerator for faster setting.
-
Once all of your pumpkin cake pops are dipped and their orange coating has fully set, it’s time to add the charming green vines. Take the ¼ cup of reserved frosting and mix in green food coloring until you achieve your desired shade. Transfer this green frosting into a piping bag fitted with a very small round tip, or simply use a disposable ziploc bag with a tiny corner snipped off. Carefully pipe delicate green swirls, curlicues, or small leaf shapes connected to the base of the “stem” of each pumpkin cake pop, bringing them to life with a touch of nature.green food colouring, ¼ cup reserved frosting
-
Your beautifully decorated pumpkin cake pops are now ready to be enjoyed! Serve them immediately as a delightful treat, or store them in the fridge for later. For the most tender and flavorful filling, always allow the cake pops to come to room temperature for about 15-20 minutes before taking a bite. This ensures the cake inside is perfectly soft and moist.
